Have you been surfing the web to figure out how to get rid of SOS only on iPhone? Look no further because you have landed on the right page! The iPhone SOS only usually appears when your device does not have access to your network carrier, the message appears immediately, and it could be for various reasons.
It’s not always an internal problem because chances are you are in a vicinity where the signals are lower and cannot pick up signals which is why it’s stuck on the iPhone SOS-only mode. You need to survey in-depth to resolve the issue and have a smooth working device. The best way to do that is to go through our seven diagnosis steps that allow you to find out a solution for the SOS-only mode and assists you in turning it off.
What Does SOS Mean on iPhone?
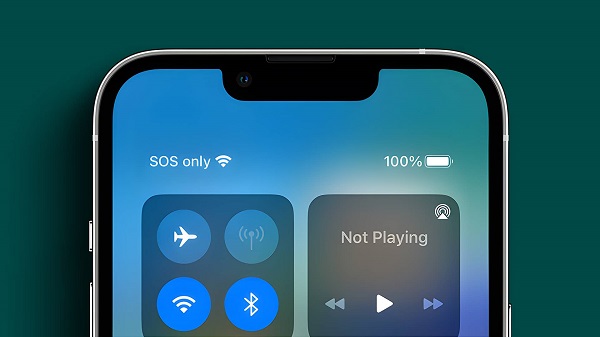
The SOS-only message appears as soon as you lose the network coverage on your iPhone. This appears on the top-right corner of your iPhone screen, and for users who use iOS 15, the messages appear on the top-left corner of your screen. If you are an iPhone user outside the North American region, you will receive a No Service text message through which you will know that you are out of coverage and don’t have a network.
The SOS Only notification appearing on your iPhone might not always indicate a drop in cellular connection. It might also happen if the SIM card is put incorrectly or has a problem. Another example is when you use cellular data without a subscription plan for the internet and calling services. Basically, the “SOS Only” text appears whenever your iPhone is unable to connect to the network.
It is crucial to remember that you can still contact us for help in case of network outages. Additionally, Apple released the iPhone 14 along with the Emergency SOS through the Satellite function. With the use of this ground-breaking feature, iPhone users can connect directly to a satellite in an emergency. The relevant emergency service receives all necessary information from the satellite at that point. This can be very helpful in cases of emergency; with other phones, you can activate the emergency call button by pressing the volume and power button.
How to Get Rid of SOS Only on an iPhone?
Do you want to turn off SOS only on your iPhone and resolve the issue immediately? We have the seven necessary steps you can take to get rid of it on your iPhone.
Check Network
The reason why your iPhone has the SOS-only message is that you are in a locality which does not have good network coverage and hence the issue. The problem can be resolved if you drive further or leave the area.
Check Your SIM Card
Your iPhone is showing the SOS-only message, probably because the placement of your SIM is incorrect. Chances are your SIM might be damaged from any side; in such cases, open the SIM tray and check if it is placed correctly or if there is any damage. If it is damaged, just replace it with a new SIM or place it correctly and insert the sim tray inside your iPhone to resolve the issue.
Restart Your iPhone
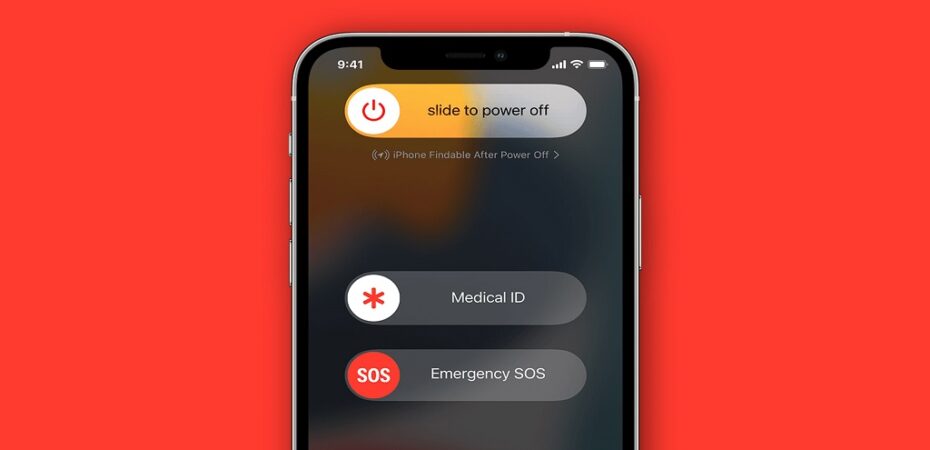
Another way to get rid of the SOS-only issue on your iPhone is to restart your iPhone. To do that, simultaneously press the power and volume buttons, and a message will appear that will allow you to shut your phone down. Slide the toggle on the right side and close your phone; after a minute or 40 seconds, press and hold the power button until the Apple logo appears.
Check for Airplane Mode
If you have Airplane Mode open on your iPhone, you won’t be able to make any calls and turn the cellular data on. Swipe downwards from the top-right corner of your iPhone and then tap on the Airplane to turn off the Airplane Mode on your iPhone.
Check Your Network Settings
Sometimes resetting the network settings assists users in getting rid of the SOS-only feature. By resetting, you will delete all the data including, Wifi devices, VPN Passwords and names, and restore the settings to default. To do this, just follow the steps below:
- Go to the Settings application on your iPhone.
- Scroll down and tap on General.
- Now from the menu, scroll down until you find Reset, and then click on the Reset Network Settings to restore the default settings.
Install and Update Your iOS

The installation and update of iOS allow you to eliminate any problems and bugs the old OS may have. If you’re facing the SOS-only problem and the previous solutions have not been helpful, then check for the latest iOS update and install it on your iPhone. To do that you need to:
- Go to Settings and then scroll below and tap on General.
- Now click on the Software Update, check to see if an update is available, and install and upgrade your iOS to the newest one.
Contact Your Network Carrier
Lastly, if nothing is working, you should contact your Network Carrier and ask them to assist you. They may replace the entire SIM or provide you with information on why your network isn’t working and providing you with any service.
FAQs
- How do I fix my iPhone SOS only?
To fix the SOS-only issue on your iPhone, you can check for a smooth and working cellular network, make sure your iPhone is not running on Airplane Mode, and your SIM card is installed correctly. Do restart your iPhone for any updates, and if the issue does not get resolved, then contact your mobile service provider for any assistance.
- What is SOS on iPhone?
The SOS feature on the iPhone means that your cellular network can be used for emergency calls. You can use it to add a list of people you can contact in cases of emergency. After the call ends, your iPhone notifies all of your emergency contacts with a message; you also have a choice to cancel this text message.
- How do I turn off SOS only?
You can quickly turn off the SOS-only mode on your iPhone by going to Settings and then searching for Emergency SOS or SOS Only option. Now disable or toggle off this feature so it can turn off.
Bottom Line
To summarise, the SOS-only issue can be extremely frustrating if you’re directly affected by it. We have provided you with a list of all the necessary steps that you need to take to ensure your issue is resolved and the feature is up and running smoothly in case of any emergency in the future. Do follow all the steps and take all the troubleshooting measures to ensure a smooth process!
Read also:
- How to Delete Wallpaper on iPhone?
- How to Voice Record on iPhone?
- How Old is My iPhone?
- How to Clear Cache on iPhone?
- How to Screenshot On an iPhone
- How to Increase the Alarm Volume on iPhone X
- Apeaksoft iPhone Data Recovery Review
Abdul Wahab
Abdul Wahab is a Software Engineer by profession and a Tech geek by nature. Having been associated with the tech industry for the last five years, he has covered a wide range of Tech topics and produced well-researched and engaging content. You will mostly find him reviewing tech products and writing blog posts. Binge-watching tech reviews and endlessly reading tech blogs are his favorite hobbies.