
Memories are a mixture of sweet and sour moments. Sometimes they are a blessing and sometimes a burden, on our mind and phone, both. You can not delete them from your mind, but your iPhone gives you the privilege to erase all the unwanted memories from your phone’s storage.
As iPhone comes with fixed storage space and you can not exceed or add space in the storage, you must clear it after regular intervals if you want to keep your iPhone working. That is to say, apart from your photos and videos, hardly any other app consumes much storage.
However, this makes it mandatory for you to clear up your storage if you do not want to use an iPhone with a turtle speed. Moreover, the reason for clearing up your storage can also be switching your phone or clearing up junk.
Let’s start with deleting photos temporarily from your iPhone or iPad.
How To Temporarily Delete Photos From Your iPhone or iPad?
If you are unsure about keeping your photos in your iPhone then, it is recommended to temporarily delete photos from iPhone. In case you find them worthy and would want to restore them. That is why, first delete all the unnecessary photos temporarily and then move towards permanent deletion.
The steps for temporary deletion of photos from your iPhone or iPad are as follows:
- The first and foremost step is to open ’’Photos’’ by clicking on the app on your iPhone. Source
- Next, you would need to find the icon of ‘’Library’’ in the bottom left corner of your iPhone or your iPad depending upon what you are using.
- There would be an option of ‘’All Photos’’ visible to you, this is the folder where all of your pictures are secured and stored.
- But do not fret, if you do not see an album named All Photos. Because it might be named ‘’Camera Roll or Recents’’ if you have not connected it to an iCloud account of your iPhone or iPad.

- Once you have found the album, open it and tap on the Select option. You would find this option in the top right corner of your iPhone.

- After clicking the button, you would be able to select multiple or all photos to delete all photos from iPhone.
Do not get confused! As the iPhone does not give you the privilege of a select-all option like Androids. But there is one trick that you can master. That is to manually select and delete photos. Yes, you can manually select all the photos that you want to get rid of, and the plus point, surprisingly, is that it is not a time-consuming task. Rather you can do this in seconds.
For that purpose, you would need to swiftly and softly move your finger in the horizontal direction to select Photos. To be sure, you can check the blue checkmarks that appear on the Photos that you have selected for deletion.
If the blue checkmark does not appear, then it means that the picture has not been selected. Moreover, remember to move your finger softly and swiftly because if not, then you might open the preview of the image instead of selecting it for deletion.
- Once you are done with the aforementioned steps. Now you can click on the Trash icon or button that is located at the bottom right corner of your mobile screen.
- Then there would pop up a notification reminding you that how many pictures you have selected for deletion and if you are sure to delete them all.
- In order to delete, you would need to select and tap on the ‘’Delete All Photos’’ option.
These were the steps that you would need to follow in order to temporarily delete Photos from your iPhone or iPad. The same steps would be followed if you want to delete photos temporarily from your iPad, as both of them have the same systems.
Now, let’s move on to the steps that will guide you on how to delete photos permanently from iPhone?
How To Permanently Delete Photos From An iPhone or An iPad?
There comes a situation when you are left with no other option than to delete all photos from your iPhone or iPad permanently. It can be because of any trauma, hurtful memories, or less storage space. In either option, you have to delete photos permanently from your iPhone.
And for your convenience, we have winnowed down the easiest steps for you to follow. Those steps are enumerated below.
- After following all the same steps as in the temporary deletion of photos from your iPhone, you would just need to follow some additional steps to make them delete permanently out of your life.
- After you are done with deleting your photos from the All Photos, Camera, or Recents album, do not feel accomplished as those photos are still in your trash. Namely, the ‘’Recently Deleted’’ album.
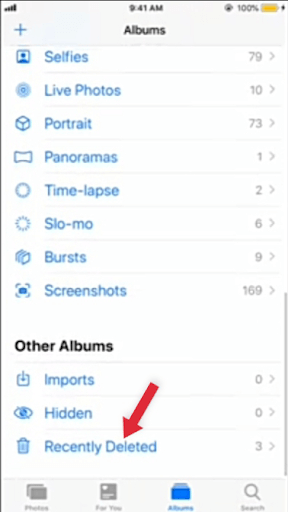
- You can find this album by clicking on the icon named Albums at the bottom centre of your iPhone’s screen.
- After clicking on the album, you would need to scroll down a little in order to find the Recently Deleted album.
- Once you have found that album, select the photos that you want to delete permanently, and you can also select the pictures that you want to restore.

- Select images swiftly and softly, as you did before, while temporarily deleting the photos, and then click on the trash button located at the bottom right corner of your iPhone’s screen.
By following these steps, you would be able to permanently delete all the pictures from your iPhone or iPad. And if you miss these steps, then remember that the iPhone will take 30 days to permanently delete photos on its own.
So, make sure that you follow these steps diligently in order to free up some space in your iPhone. If you are concerned about how to delete all photos from iPad, then do not worry and follow all the same aforementioned steps.
Having said that, there is one more thing that you need to take care of. And that is your iCloud account. If you only want to permanently delete photos from your iPhone and not from the other connected devices, you would need to follow some additional steps.
How To Secure Photos In iCloud?

You would be skeptical about your photos, that they might get deleted from all of your connected devices, having the same iCloud account. This is a genuine threat because if you do not follow the following steps, you can lose your data for good.
- The first and foremost step to save your photos from getting lost permanently is to sync and secure them on any iDrive, OneDrive, or Google Photos account. In that way, you can access them anywhere, any time, from any device.
- Other than that, go to the Settings app on your phone, where you would see your name on the front, which is your iCloud account.
- There you would find an option of Manage Account, select that option, and you would see a graph showing how much space you have utilized and which app is getting utilizing more storage space.
- Under that graph, there you would find an option of Photos.
- Select that option, and that would lead you to another page. Go to that page, and toggle off the photos button and shared photos button.
- In this way, you would be able to disable Photos from your iCloud account. And your photos would not get deleted from other devices.
- But the thing that you need to remember is that, once you enable the Photos again in your iCloud account, the photos you have deleted will vanish suddenly.
Above are all the steps and precautions that you would need to follow diligently while deleting photos from your iPhone or iPad. Whether the deletion is temporary or permanent, make no mistake that can not be reversed.
Other than that, you can also delete some selected photos, and for doing that, all the steps would be the same; the only difference would be in your selection of Photos. That is to say, if you want to erase all the memories of a specific person, then, luckily, the iPhone has the feature of recognizing faces and making different folders.
In that specific folder, you would get all the pictures of that person, and then you would be able to delete all of their photos.
Conclusion
iPhone and iPad come with fixed storage space. The new models that Apple launched have enormous storage, and you would not need to delete anything except extremely heavy files. But if you own an old model, then you can follow all the aforementioned steps to permanently or temporarily delete photos from your iPhone and iPad because it’s not wall art that you at remove, and we have winnowed down all the necessary steps.
Read Also
- How to Reset an iPhone Safely and Quickly
- MacDroid Review
- Should You Use Free iPhone VPNs?
- How to Keylogging on iPhone Legally
- How to Recover Deleted Photos from an SD Card
- How to Convert M4A to MP3 On a macOS
- How To Change Kik Username?
Abdul Wahab
Abdul Wahab is a Software Engineer by profession and a Tech geek by nature. Having been associated with the tech industry for the last five years, he has covered a wide range of Tech topics and produced well-researched and engaging content. You will mostly find him reviewing tech products and writing blog posts. Binge-watching tech reviews and endlessly reading tech blogs are his favorite hobbies.