
It’s incredible how reliable and bug-free Mac computers are for everyday use, especially compared to Windows-based machines. Almost everything you ordinarily want to accomplish goes so easily that you begin to take this engineering marvel for granted.
However, in rare circumstances, macOS will display an error message. The majority of them are incredibly descriptive and straightforward to fix right away. The “verification failed there was an error connecting to the Apple ID server” issue, which continues to perplex many customers over the years, is an exception to this rule. Let’s look at the best approaches to cope with it.
What Does The Apple ID Verification Error Mean
Despite the fact that “verification failed error connecting to Apple ID server” strives to be self-explanatory, there are a plethora of possible causes. This problem usually occurs when you try to open iCloud services, iTunes, backups, or the App Store on a Mac.
While the problem may be tied to your Apple ID, it may also be caused by a WiFi connection, VPN interference, date and time settings, or an operating system bug. Here are all of the possible solutions.
1. Restart Your Mac Computer
During the time you were using any of your Apple devices, such as your iPhone, Mac, or others, it may have encountered a network problem. Restarting your computer, phone or tablet will give it a new start and reset all of your settings.
The following procedures will entail adjusting and refreshing the device settings, which may require additional steps and instructions. So let’s avoid that by rebooting your smartphone first!
To reboot an iPhone, iPad, or iPod, follow these steps:
- To start, press and hold down the power button on the device for several seconds.
- Then, a red slider will pop up to turn off the device.
- Swipe to the right and wait 20 seconds.
- Finally, restart your phone by holding down the power button again.
Additionally, the following are two ways to restart your Mac:
- To access your Apple menu, click the Apple icon in the home screen’s upper-left corner.
- Then, choose Restart.
Alternatively,
- Hold the power button down until the options appear.
- Then click Restart.
Check to see whether your Apple ID can be connected now! If the problem remains, move on to the following solutions.
2. Check Apple System Status
This verification issue may also arise if the Apple Server is unavailable due to maintenance or a temporary outage. If rebooting the device fails, check the Apple System Status page to ensure that the server is operational before attempting any further alternatives. Here’s how to go about it:
- On your iPhone, iPad, or computer, go to the Apple System Status page.
- Look through the list of services for “Apple ID” to see if it is available.
If the dot beside it is green, it signifies the server is operational. If it’s gray, it indicates the server is down for maintenance, in which case you just have to be patient till it’s back up.
3. Log Out Of iTunes & App Store

You may be able to resolve this Apple device issue by logging out of iTunes and the App Store and then signing back in. This can assist in establishing a new connection between your iPhone and the Apple servers. Here’s how to sign out of icloud:
- Tap “iTunes & App Store” in your device’s Settings menu.
- Select “Sign Out” after tapping on your Apple ID.
- Sign in again to see whether the problem has been resolved.
4. Logging Back Into Your Account.
Apple IDs can become stuck in servers owing to poor internet connections, sluggish servers, and other factors. It’s very unusual for a copy of the account’s request to be on the way to Apple’s servers, which can cause issues as you send more requests.
Signing out of your account is the equivalent of rebooting your device to restore your connection to Apple’s servers. This will end your current active status on Apple’s servers, and when you log back in, the servers will enroll you in a new instance.
Here’s how to re-enter your Apple ID credentials on your Mac:
- Launch the Apple menu from the top left corner of your screen.
- Then, select System Preferences.
- Now, in the sidebar, choose Apple ID and then Overview.
- Then, select Sign Out.
- Lastly, log back in your Apple ID to check whether this resolves the issue.
This should resolve the Apple ID connection issue. If you choose to go through it on your iPhone or iPad, follow these steps:
- First, go to your Settings.
- Second, scroll down to the iTunes & App Store section.
- Sign out by tapping on your Apple ID.
- Finally, log in using your Apple ID once more.
Re-logging into your Apple ID should resolve the “Verification Failed: There Was an Error Connecting to the Apple ID Server” issue. If the error persists, move on to the following technique.
5. Request an Apple ID verification code
A transitory bug likely caused the problem connecting to the Apple ID server. To resolve the issue, try signing in to Apple ID from another device or through icloud.com, but obtain an Apple verification code first.
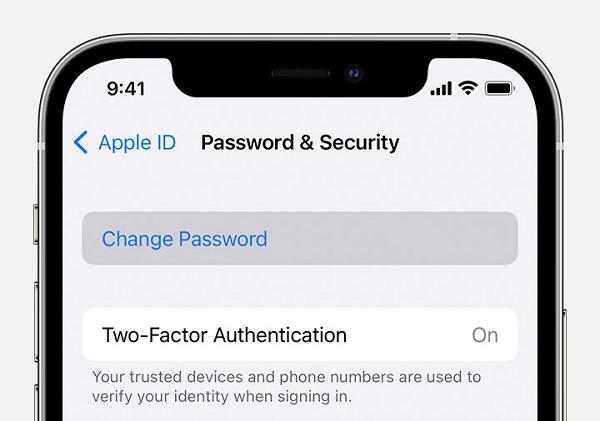
The code is typically transmitted to your iPhone when you attempt to sign in to iCloud using your Mac. If you want to learn how to acquire an Apple ID verification code without a phone, go to System Preferences:
- Go to System Preferences and select Apple ID.
- Navigate toward the Password & Security section.
- Select “Obtain a verification code.”
- Copy this code to be used when logging in to iCloud.com.
6. Change your Apple ID password
Another option is that the warning “there was an error connecting to the Apple ID server” is related to authentication and understanding why resetting the Apple ID password could force the system to restart. Here’s an easy method to create a new Apple ID password:
- Go to System Preferences and select Apple ID.
- Navigate to Password & Security.
- Choose “Change password…”
- Enter your Mac’s operating system password.
- Type the new Apple ID password two times and then click Change
7. Test your WiFi connection
Another external factor that makes Apple ID verification difficult is an unreliable internet connection. To avoid this, turn off your phone’s hotspot and connect to a trustworthy WiFi network.
If you’re still having issues, try turning off and on your WiFi from the menu bar. You could also reboot the router by turning the back panel switch on and off.
To see if your WiFi is completely operational, perform the following tests:
- Visit speedtest.net.
- Click the Go button.
- Examine how quickly your Mac can download as well as upload files. If the figures are significantly lower than those mentioned in your contract, call your internet service provider (ISP).
8. Reset and Update Network Settings
If your device isn’t connecting to the internet and you’ve previously tested your WiFi and cellular connections, it’s time to change your Network Settings. It will not remove any information from your iPhone.
However, it will reset your iPhone’s cellular connections and prompt you to login back into WiFi networks. To reset your iPhone’s network settings, follow the steps below:
- On your iPhone, navigate to Settings, then General.
- Now, tap Reset, followed by Reset Network Settings.
- Your iPhone will prompt you for your password. Enter your login information and confirm by tapping Reset Network Settings.
- This will reset and delete all of your networks. You should now be able to log back into the networks with your Apple ID.
Don’t give up if you’ve tried all the options listed above and are still receiving the issue. Below are some additional solutions to this problem.
9. Restart Your Wi-Fi Network.
Did your internet connection go down at random? And does your household rely entirely on Wi-Fi?
In either case, turning down the Wi-Fi modem for just a few minutes may extend its life by allowing it to rest.
However, we will just be rebooting/restarting it this way. In a nutshell, your Wi-Fi network is nothing more than an IP address or node inside an electrical grid which receives and transmits data to your isp. In the odd event that your internet modem’s connection is lost or malfunctions, rebooting it will restore regular operation.
It is essential to understand that simply being connected to the internet doesn’t really imply that certain aspects of your connection have failed. This solution is applicable to a variety of other issues, mainly if the Wi-Fi is not routinely restarted or has a tendency to disconnect at unpredictable times.
Here’s how to restart your wireless network or internet modem:
- Internet modems are available in a multitude of designs and sizes. If you don’t understand how the modem works, call your provider or a knowledgeable family member first to avoid harming the modem or disconnecting any of the wires.
- The majority of modem power switches are positioned behind them. Try to find a hidden button and press it. If that is the power button, the lights on your Wi-Fi will turn off.
- Please wait a few seconds or a minute before pushing the very same button to switch it back on.
Now, try connecting to your Apple ID or Apple music log in via the iPhone, Mac, or other devices to see if this resolves the issue.
10. Date & Time Settings.
One protocol and necessity of most servers is that your device has the universally correct date and time set.
This is due to the fact that there can be many problems involving your local clock and the standard online time. Date & Time settings frequently fail after an iOS/macOS upgrade, network connectivity failure, or simply in general.
In fact, this is one of the most frequently proposed solutions by users who have also seen the “Verification Failed: There Was an Error Connecting to the Apple Login ID Server” error.
Here’s how to configure your mobile device’s Date & Time settings:
- Open the device Settings app from the home screen.
- Then, find and click on General.
- Now, launch Date & Time.
- Turn on ‘Set Automatically’ and set the Time Zone to your current location.
Alternatively, here’s how to configure your Mac’s Date & Time settings:
- To begin, go to the Apple menu and then to System Preferences.
- Then, select Date & Time.
- Finally, pick the Set date and time automatically option, followed by your region.
In case your settings are set to automatic, consider disabling and re-enabling ‘Set Automatically’ to refresh them. attempt Apple ID login once more.
11. Turn Off VPN Protection
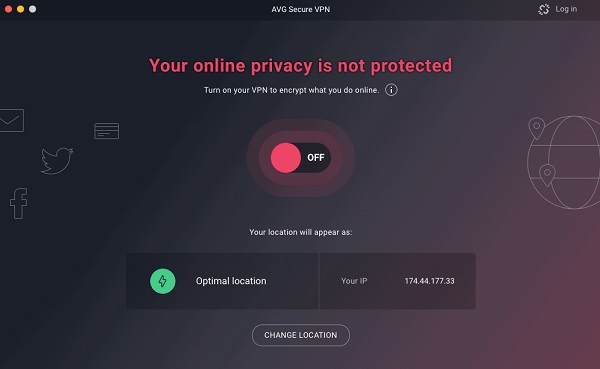
Remember why we had to restart your Wi-Fi connection, reboot your device, and then attempt to connect over Wi-Fi or cellular data? This is due to the fact that we wished to restore your settings to their default authorized network connection.
VPNs may claim to mask your IP address and data from harmful websites, but they also conceal your connection to Apple. Most high-level servers block VPNs as a security measure, presumably why you can’t access your Apple ID.
Here’s how to disable any VPN settings on your iPhone:
- Go ahead and launch Settings.
- Next, locate and select the VPN.
- Finally, disable it and attempt to connect your Apple ID account. If this has resolved your issue, you may restart your VPN. This should not affect your Apple ID’s current signed-in state.
Alternatively, here’s how to disable the VPN on your Mac:
- To begin, go to the Apple menu in the top left of the screen.
- Select System Preferences and then network.
- Then, choose the VPN connection on the left pane in the Network window.
- Finally, click Disconnect.
Using a VPN is excellent internet practice and can serve as an essential protector from data miners, specifically if you visit public networks. If this does not work, try asking any of your members of the household if they have set up a VPN, either straight on the Wi-Fi modem or just on your device, before moving on to the following steps.
Third-party VPNs definitely exist, and the only people who can turn them off are those who are acquainted with the software.
If you can locate a 3rd-party VPN on any device, you can conduct a fast Google search to learn how to disable it if the household member is currently occupied.
12. Update Your Device’s OS.
If an Apple device’s os is out of date, it can develop issues and problems.
Most problems, including connection errors, can be resolved by upgrading your iOS or macOS. Since bugs, glitches, as well as other performance issues, necessitate monthly upgrades and code changes, constantly updating your device’s operating system is an excellent approach to avoid most mistakes and bugs.
Ensure your device has more than 40% battery life, plus it is connected to a steady Wi-Fi connection (or LAN connection if you are using a Mac) before updating. Depending on the bandwidth of the Wi-Fi network and the technology of your device. Updating can take anywhere from 5 minutes to one hour.
The following are the steps for updating your iOS on your mobile device:
- Go ahead and launch Settings.
- Then, select General.
- Now navigate to Software Update.
- If an update is available, just click Install Now.
Alternatively, here’s how to upgrade macOS:
- To begin, go to the Apple menu in the upper left corner of your screen.
- Navigate to System Preferences.
- Finally, select Software Update.
Updating iOS or macOS ensures that you have the most recent version of the OS on an iPhone, iPad, Mac, and iPod. This will also enable you to sign in to your Apple ID without any problems.
13. Contact Apple Customer Support
If all of these methods have failed, you may choose to reach out to Apple Customer Support or Apple Care Check for help instead. Their tech support personnel may be able to spot a fault in your phone or on their servers that simply cannot be resolved by just messing with your settings.
If you’re considering returning a product, it’s also a good idea to see if you’re eligible for any warranty coverage.
Bonus: How To Create A New Apple ID
If no other method fixes the There Was an Error Connecting to the Apple ID Server error, then you can create a new Apple ID by following these steps:
- Open your iOS app’s settings menu.
- Click the Sign-in button that appears on your device’s screen.
- Now enter your Apple ID and password.
- Next, select “Forgot password or don’t have an Apple ID?”
- Tap on Create a free Apple ID.
- Select your birth date and type your name.
- Then press the ‘Next’ button.
- Enter your current/active email address.
- Alternatively, you can select ‘Get a free iCloud email address.’
- Now, follow the onscreen instructions to verify your email address.
- Set the device region and create a strong password.
- Proceed to the two-factor verification procedure to complete the ID creation process.
Final Thoughts
It is inconvenient to receive a “Connecting to Apple ID Server” problem when trying to sign in to your Apple ID, iTunes, iCloud, and App Store.
This problem could be caused by a number of factors, such as network and iOS difficulties, along with an incorrect date and time.
Try the solutions mentioned in this article before taking your phone to a repair facility.
If you have any further queries about this post, please express them in the comments section below.
Abdul Wahab
Abdul Wahab is a Software Engineer by profession and a Tech geek by nature. Having been associated with the tech industry for the last five years, he has covered a wide range of Tech topics and produced well-researched and engaging content. You will mostly find him reviewing tech products and writing blog posts. Binge-watching tech reviews and endlessly reading tech blogs are his favorite hobbies.